
Click here for installing Big Sur in VMWare Workstation
To get started we need to download the High Sierra ISO. Click the link to download the ISO. If your getting the message “This copy of the Install macOS High Sierra.app application is damaged…”, set your Mac date back to Dec 2018. Thanks to randell for the info. The fix can be found here:
Sha1sum: 48757AB383D390E660062D0B1E2ACF504AC93345
File Size: 5.07 GB
File Name: macOS_High_Sierra_10_13_1_Official.iso
File Format: ISO
- Download MacOS Unlocker 3.0.3 by paolo-projects in github which is a patch to remove restrictions for Mac OS X VM creation.
https://github.com/paolo-projects/unlocker/releases/download/3.0.3/unlocker.zip
By default VMWare doesn’t support Mac OS X VM but a patch created by DrDonk enables users to create a Mac OS VM in VMware Workstation, VMware Workstation Player and VMware Fusion or VMware ESXi/vSphere Hypervisor - Extract the unlocker-master.zip and run “win-install.cmd” as administrator. Remember to uninstall previous unlocker before installing a new version


- Run VMWare Workstation and create a new virtual machine
- Select “Custom (advanced)”
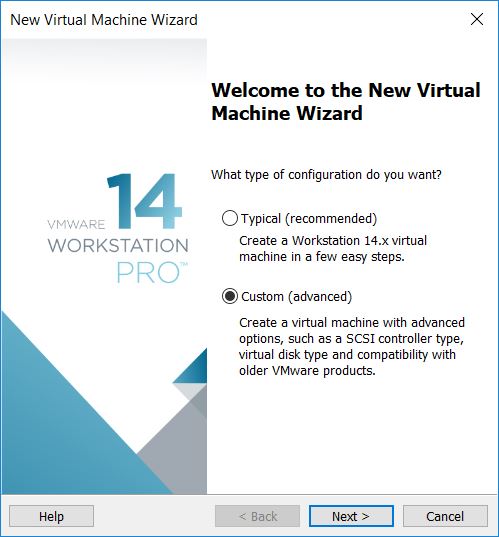
- Set hardware as “Workstation 14.x”

- Select “I will install the operating system later”

- Select “Apple Mac OS X” as guest OS. The MacOS Unlocker patch enabled the Mac OS X support of VMWare Workstation. Select “macOS 10.13” as our OS version

- Set your VM name and VM location. It is optimal to use an SSD as your VM location for best performance

- Set number of processors to 1 and number of cores per processor to 8. I set these before to 2 processors and 2 cores and I was getting loop issues when I ran the VM.

- Set your memory to 8GB. You can set the memory at least 2GB but if you encounter looping issues when starting the VM try to set it higher

- Select “Use bridged networking” as your network connection. This option lets you connect to the network directly.

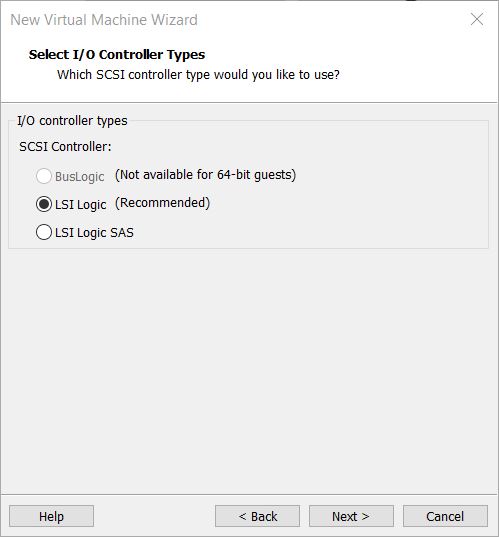
- Set I/O controller type to “LSI Logic”
- Set Virtual disk type to “SATA”

- Select “Create a new virtual disk”

- For disk capacity, set disk size to 40GB. Select “Allocate all disk space now” and “Store virtual disk as a single file”

- Specify the disk filename. You can manually locate the disk folder. The default vmdk location is the VM folder location

- Check VM settings and then click Finish

- Wait for VMWare to create the virtual disk

- Once the VM is created we need to enable virtualization engine in the VM settings. Open VM settings and select “Processors”. Enable “Virtualize Intel VT-x/EPT or AMD-V/RVI” and “Virtualize CPU performance counters”

- Go to “CD/DVD (SATA)”. Select “Use ISO image file:” and browse for the downloaded “macOS_High_Sierra_10_13_1_Official.iso”

- We need to edit the vmx file and add a parameter. Locate your mac OS x vmx file which is located in the VM folder

- Edit the vmx file and add this parameter at the end of the list:
smc.version = "0"

- Start your High Sierra VM and wait for the setup page
- Select your preferred language

- Select “Disk Utility”

- In the “View” icon, enable “Show All Devices”. Verify if the “VMware Virtual SATA Hard Drive Media” exists

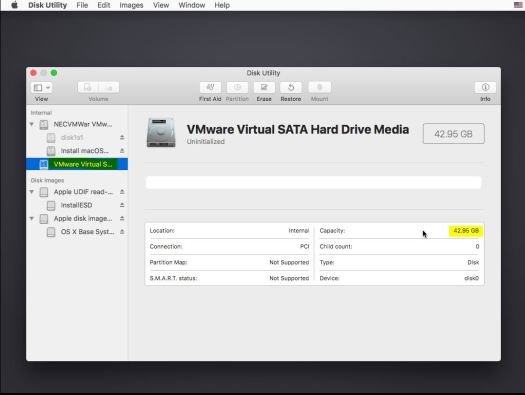
- We need to format the said drive. Select “VMware Virtual SATA Hard Drive Media” and then “Erase”

- Set Drive name, set format to “Mac OS Extended (Journaled)” and scheme to “GUID Partition Map”. Select “Erase” and wait for the process to finish

- Exit Disk Utility and Select “Install macOS”
- Select “Agree” to the terms of the software license agreement

- Select the previously created drive for the Mac OS X system drive and then select install

- Wait for the High Sierra installation process to finish. The system restarts after the installation

- Wait for High Sierra to finalize the installation

- Once the installation is done you can already setup your Mac OS X High Sierra


This is very useful. Thank you so much!
LikeLike
i cant unrar that with winrar
LikeLike
No need to extract the iso. You just need to mount it to your vm’s cd drive
LikeLike
If you are referring to the mac os unlocker, try using 7zip
LikeLike
Is it possible to download Mac OS Mojave and update on VMware ???
I mean, I have VMware which is running high Sierra, can I go to App Store and download Mojave and update it????????
LikeLike
I haven’t tried it yet but you can test it, just create a snapshot first
LikeLike
Snapshot??? Meaning how do I do that?
LikeLike
Hey please help me
LikeLike
Hey please help me
LikeLike
Get a snapshot first before trying to update to the latest Mac OS
LikeLike
Not able to connect to the internet
LikeLike
Try to reset your network in virtual network editor
LikeLike
What does snapshot help in????
Have problem in connection the internet? What should I do
LikeLike
For the internet connection, try to reset your network in virtual network editor
A snapshot creates the current image of your VM so you can revert to it. It is best practice to create a snapshot of your VM after installing the OS so you can revert back to default. I do this for my testings
LikeLike
The unlocker did not give me the Mac OSX option. I installed as “administrator” like you said. I am running VMWare 14. I had this working a year ago but did some housecleaning and deleted my VM images. Stupid.
LikeLike
Hey hi. I lost the setup file for VMware and high Sierra. I forgot how I downloaded VMware and macOS high Sierra. And the crack. Thank god I saved this page as a bookmark CAN U HELP ME WITH ALL THAT PLEASE.
LikeLike
I’m getting the following error when trying this on workstation pro 15
IOError: [Errno 13] Permission denied: u’C:\\Program Files (x86)\\VMware\\VMware Workstation\\vmwarebase.dll’
unlocker returned -1
LikeLike
What version of MacOS Unlocker did you use? Did you try this one
https://github.com/paolo-projects/unlocker/releases/download/3.0.3/unlocker.zip
LikeLike
In case anyone is trying this and gets a message “This copy of the Install macOS High Sierra.app application is damaged…”, don’t fret, the ISO supplied is actually fine. You need to set your Mac date back to Dec 2018.
To give credit where credit is due, here’s the page I found that shows you how to do that. (hope it’s okay to supply this link)
View at Medium.com
So thanks so much for this guide and supplying the files needed!
LikeLike
“The CPU has been disabled by the guest operating system. Power off or reset the virtual machine.” is the error I get. I’ve already enabled virtual machines in bios.
LikeLike
I’m on VM Workstation 14 but the unlocker is not giving me the option. I installed v3.0.3 any ideas?
LikeLike